 Pin It
 The kitchen filled with the faint aroma of butter and vanilla as I experimented with these Taurus Zodiac Cookies, not out of some grand plan, but because I’d impulsively bought a pack of zodiac-shaped cutters on a rainy afternoon. There is something hypnotic about painting delicate gold constellations atop crisp cookies, almost like adding a secret wish with every brushstroke. One batch in, and the gentle warmth of the oven made the gold sparkle seem even more enchanting against the gray sky outside. These Taurus cookies may take a little extra time, but the reward feels positively celestial. Besides, who can say no to a bit of starry-themed magic on an ordinary day?
I can still picture my friends huddling around the kitchen table, picking out which zodiac cookie matched their chart best—some comparing gold accents, others trying to guess the flavors. The most stubborn Taurus in our circle insisted on painting her own symbol, and the laughter over slightly wonky horns echoed long after the last crumb disappeared.
Ingredients
- All-purpose flour: Gives the cookies their delicate yet sturdy structure, making sharp edges for the Taurus shapes—sift it for the smoothest dough.
- Unsalted butter: Softened butter is essential for that classic melt-in-your-mouth crumb; leave it out of the fridge for at least half an hour before starting.
- Granulated sugar: Brings sweetness and helps the cookies bake up with a slight golden edge—don’t skimp here.
- Large egg: Binds everything together and adds a little richness; room temperature eggs blend best.
- Pure vanilla extract: Adds warmth and depth—good vanilla truly elevates the flavor.
- Almond extract (optional): A touch for nuanced flavor, but if you’re not an almond fan, skip or use citrus zest for brightness.
- Salt: Sharpens all the sweet notes—never forget the pinch.
- Powdered sugar: Essential for a smooth royal icing that pipes and paints gracefully.
- Egg whites or meringue powder: The base of classic royal icing; meringue powder is my lazy-day secret for food safety.
- Lemon juice: Gives icing a subtle tang and keeps things from being too sweet.
- Vanilla extract (in icing): Just a little, to echo the cookie flavor.
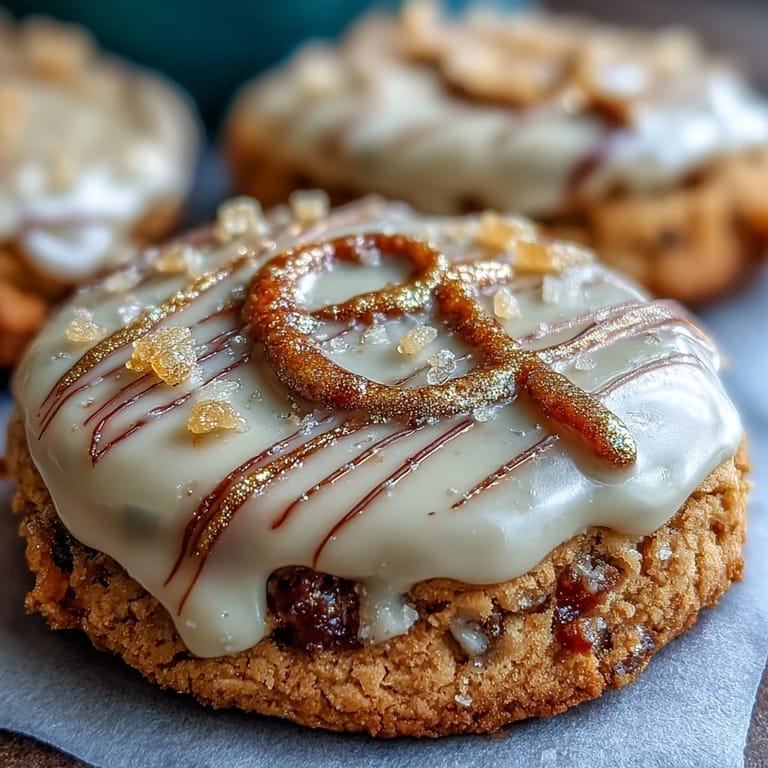
- Edible gold luster dust: The star of the show—bring out a fine brush and watch the magic unfold.
- Clear alcohol (like vodka or lemon extract): This evaporates quickly, making the gold paint glide onto the icing with a shimmer.
Tired of Takeout? 🥡
Get 10 meals you can make faster than delivery arrives. Seriously.
One email. No spam. Unsubscribe anytime.
Instructions
- Mix the Dough:
- Cream together butter and sugar until it looks pale and airy, then beat in the egg, vanilla and almond extracts. Whisk flour and salt separately, then slowly mix into the wet ingredients until you get a soft, pliable dough.
- Chill for Success:
- Divide the dough in half, shape into discs, and wrap them up—don’t skip chilling for at least 30 minutes, or they'll be a sticky mess.
- Shape and Bake:
- Preheat your oven to 350°F (175°C), then roll dough to a quarter inch thickness on a floured surface. Cut out Taurus or zodiac shapes, set them on parchment-lined trays, and bake until the edges are just turning pale gold—let them cool completely before you touch them.
- Make the Royal Icing:
- Whip egg whites or meringue powder with powdered sugar until glossy and you get soft but sturdy peaks, then blend in lemon juice and vanilla. Divide some off to color if you like, stash some pure white for gilding, and scoop into piping bags.
- Decorate with Gold:
- Pipe outlines and flood the cookies, then let the icing set undisturbed for at least 2 hours. Mix luster dust with a drop of alcohol to form gold paint, and brush out Taurus symbols or constellations—hold your breath for the first line, then get bold!
- Box Up for a Starry Surprise:
- Lay cookies gently in a box lined with parchment, slipping a zodiac card or a sweet note in for extra charm, and seal it up for gifting.
 Pin It
 Watching the golden Taurus cookies disappear at a friend’s birthday party, I realized they had become more than just pretty treats—suddenly, they were personality-filled showstoppers and conversation starters. That sparkle on each cookie had a way of drawing everyone in, even bigger skeptics who claimed not to care about their star sign.
Getting the Gold Just Right
At first, I overloaded my brush with luster dust and the lines blurred, but a little goes a long way. The trick is to swirl the luster dust with just enough clear alcohol for a liquid gold paint that glides but doesn’t run. Let each layer dry before adding more, and remember, your brushstrokes show—embrace their handmade charm.
Choosing Cookie Cutters for Maximum Impact
You don’t need an exact Taurus-shaped cutter—I’ve used bull heads, moons, and even classic circles with piped constellations. Mixing shapes makes the cookie box look even more thoughtfully arranged. Just try for similar thicknesses for even baking so none end up over-crisped or underdone.
Gifting and Storing With Flair
Nothing beats opening a box and being met with a constellation of gold-flecked cookies—layer them between sheets of parchment so designs stay flawless in transit. Tie on a ribbon or tuck in a horoscope note for a customized touch.
- Keep any extra cookies in an airtight tin for up to a week.
- Refresh the gold detailing with a quick touch-up brush before gifting.
- Store iced cookies flat to keep the shine and avoid smudges.
 Pin It
 May every batch bring a little stardust and fun to your kitchen, whether you’re a Taurus or just feel like celebrating the stars. Share them with the stubborn, loyal folks in your life—they might just appreciate the extra sparkle.
Your Questions Answered
- → How long should I chill the dough?
Chill the flattened dough discs for at least 30 minutes to firm up the butter; longer chilling (1–2 hours) improves rollability and helps cookies hold their shape during baking.
- → Can I use meringue powder instead of egg whites for royal icing?
Yes. Meringue powder mixed with water yields a stable royal icing ideal for piping and flooding; it also reduces food-safety concerns and keeps icing glossy when fully set.
- → What’s the best way to get smooth flooded icing?
Thin stiff royal icing slightly with a few drops of water to reach flood consistency, pipe an outline first, then fill the center. Tap the tray gently to pop air bubbles and let dry undisturbed.
- → How do I make edible gold paint?
Combine edible gold luster dust with a few drops of clear alcohol (vodka or food-grade clear extract) to create a paintable sheen. Brush on only after the icing is fully dry to avoid bleeding.
- → Can I swap almond extract for another flavor?
Yes—citrus zest or lemon extract brightens the dough, while vanilla alone gives a classic profile. For nut-free baking omit almond extract entirely or use a mild substitute.
- → How should I store the finished cookies?
Store completely dry, decorated cookies in a single layer in a box lined with parchment. Keep them in a cool, dry place for up to one week; avoid humid environments that soften icing.